-moz-box-shadow: 1px 1px 5px rgba(0, 0, 0, .1);
Showing posts with label lilly pulitzer. Show all posts

Saturday, November 22, 2014

How To Survive Finals


Finals time is upon finally upon us. *Insert collective groan from entire student population.* Every semester we know that finals will inevitably be here before we know it, but somehow we never seem to be prepared. In honor of finals coming up, here are a few tips to help you survive!

Music
Music is a huge part of studying for me. Personally I listen to film scores because they don't have distracting lyrics, but it also doesn't put me to sleep like classical music does. A great way to hear a bunch of awesome film scores is to listen to the Harry Potter film score radio on Pandora. Another station a lot of people like is the Hans Zimmer radio. No matter what I kind of music you like, I would definitely recommend something without lyrics or anything super distracting for intense studying!

Caffeinate and Snackinate
I totally made those words up, but don't forget to keep your body fueled! Of course coffee is the natural go-to (because caffeine, duh!), but don't forget to drink plenty of water as well! (I like to drink 2 bottles of water for every cup of coffee) and eat plenty of snacks, but don't forget to eat real meals as well!

Plan Plan Plan!
When it comes to finals time, planning is key! Plan out your study times and when you are going to study for each class. First, make sure you write down when and where every single one of your finals is. As well as writing everything in my planner, I also printed out a calendar to hang on my wall above my desk so I have it readily available. I like to plan to study an hour then take a ten or twenty minute break (to read My Life As Hayden, duh!). Make sure when you are studying to be completely off of social media! I've found that putting my phone across the room (on silent or vibrate) is the best way to not get distracted! Don't forget to study plenty in advance (aka NOT the night before!) your final!

Write in all of your due dates and finals so it's easily accessible!
Make Your Space
Whether you're working at your own desk or at the library, a clear work area is a must! Not only does it help keep you from being distracted, but it helps you feel more productive as well. I like to spread out all of my notes and other study materials because it helps me feel less cluttered (and ultimately more productive) and I like to be able to see everything at once. Make sure you have everything you need (pens, notes, computer, flash cards, post-it notes, etc.) before you start studying so you aren't constantly interrupting your study time.

Learn How To Study
Figure out how you study best and utilize it! For me, color coding and flash cards help me best. Flash cards are my go to study tool (try Quizlet if you are in a pinch and want to use online flashcards), but if I can't do flash cards, I love to rewrite my notes and color code them. There are some awesome study tips on Pinterest that I would definitely utilize!

Study Comfy
I am a huge believer in oversized tshirts and leggings. If I'm going to hunker down for some intense studying, I want to be as comfortable as possible. Please, avoid wearing your onesie to the library at all cost, but make sure you're not dying because you're in "real pants"!

The Day Of…
Dress for success! On the days I have tests I love to dress up (aka wear real pants and not a tshirt) because it makes me feel like I have my crap together. There's nothing like walking into an 8 am exam looking -and feeling- super confident even though you stayed up until 3 the night before studying. "Dressing up" always puts me in a "YOU GO GLEN COCO" state of mind, which I think results in better test results!
When it comes to studying the day of the test, don't. Yes, you heard me right! In my first semester of college, my calculus professor told us "Cram, cram, cram the night before if you need to, but on the day of the test, take it easy. I wouldn't even open the book!" Now while I don't intensely study the day of an exam if I can help it, I do review the test material. Usually I'll make flashcards or an outline of important topics and quiz myself. In doing this, you are calmly going over the test material without the added stress of cramming the day of. Just relax, and you'll be in a better frame of mind for taking the test!

Stay hydrated in the cutest way possible…with a Future First Lady koozie!
Don't forget to reward yourself after studying, either! Head over to Future First Lady and get 10% off your purchase with the code HaydenL. Finals only come once a semester, it's totally ok to treat yourself with some retail therapy ;)

Sunday, October 19, 2014

DIY Lilly Invitation

Recently I was asked to make a baby shower invitation for a family friend that is expecting a little girl. I've made things on the computer in the past (like my own thank you cards, computer backgrounds, and another baby shower invitation), but this one is really special! I've developed a different style since I started creating things, and I'm so proud of how this one turned out! The parents wanted something classic, but that would match her nursery colors (Lilly's First Impression was the obvious choice), and they also wanted to incorporate her monogram (because, duh! *insert hair flip emoji*). Adding the Bible verse at the bottom made it even more special because Kinley has been prayed about for so long! I made all of it on Word Publisher, then had them printed out on a creme shimmer paper at Office Depot! Making something like this is great because it's totally personalized, and only costs to have it printed! Have any questions about it? Email me!

Doesn't she just have the sweetest little name?! I can't wait to meet this precious baby girl!

Friday, September 26, 2014

#winning

This week has been a crazy, hectic, "I'm losing my mind" kind of week. That being said, I don't have one of my "normal" blog posts to post, so this is more of a post about some cool things I thought I would share.

1. HerCampus is giving away a $500 Lilly Pulitzer shopping spree! That's right, two of my favorite things (HC & Lilly) have teamed up to make sure summer never ends. Find details about this and other awesome giveaways here!


2. Remember my fabulous Custom Lilly shorts featured here? Well get excited, because now you can get 10% off of your first purchase by using this link!


3. Alex and Ani is on RueLaLa right now! You may have seen my post about wanting an Alex and Ani bracelet not too long ago, and I'm so excited that it's on RueLaLa! If you want to join RueLaLa and get awesome deals on crazy cute stuff, click here!


4. Last but not least, I'd love to hear some ideas on new posts! And if anyone is an up and coming graphic designer or knows anyone who designs webpages, I'd love to speak with you!

Don't forget to enter to win a SABRE alarm system here!


Wednesday, July 30, 2014

Custom Lilly Pom-Pom Shorts


I have such a hard time finding things that fit my petite frame, especially things in Lilly Pulitzer. I can't tell if Lilly runs big, or if I'm the only one that has this problem. Recently I went to the Pink Narcissus in Pier Park to try on a pair of Lilly shorts, but even the 00s fell off of me. I have a small frame due to 1) genetics and 2) the back brace that I wore for over 2 years acted as a corset, and as a result my ribs and hips were very slow to expand. I voiced my frustrations to the Lilly team, but I wanted action right away! Then, I found Custom Lilly's Instagram! She was having a giveaway at the time, and one of my friends posted about it.

Custom Lilly makes custom shorts and skirts out of Lilly Pulitzer fabric. These aren't some imitations, it's the actual print! She offers sizes XS-XL, and the XS was absolutely PERFECT for my tiny frame! They have an elastic waist and the cutest pom-pom detailing at the bottom. I actually won Custom Lilly's giveaway (yay me!!) and I had the hardest time picking between Lobstah Roll and She She Shell. I ended up going with She She Shell, because I'm always a sucker for textured fabric! Custom Lilly just launched her website today and you can check it out HERE!! Also, be on the look out for a guest post with my new friends at Custom Lilly and Amy Believes In Pink


Wearing my Custom Lilly shorts out to eat for my brother's birthday!


Monday, June 30, 2014

Lilly Pulitzer taste on a Forever 21 budget

I absolutely love Lilly Pulitzer. The bright colors and enticing patterns make you feel like you're always in a "Sunny State of Mind". The only thing I don't love is the price tag of brand new Lilly. As a college student that has to pay for things like sorority dues on my own, and has no income during the school year, I can't afford brand new Lilly. I mentioned in my About Me that I love finding a good deal on something. I found a members only website called RueLaLa that offers super discounted, brand new Lilly that is a season or two old quite often! (If you want to join this site, click here or comment with your email!) Another place that sells new and EUC (excellent used condition) Lilly is the Re-Lilly Group on Facebook. In fact I just bought a NWT (new with tags) Let's Cha Cha Sarasota tunic for $100 (which is AWESOME because most Let's Cha Cha styles go for ABOVE the retail price!) that will go perfectly with my Let's Cha Cha swimsuit bottoms I found on eBay for $18. I wasn't kidding when I said I loved finding a good deal. While you're on the Re-Lilly group, go check out my XS Hotty Pink Sailor's Valentine Dress and Guiding Light Shorts listings! If you're interested in buying one of these pieces, you can email me at haydenlee2013@gmail.com with your offers. Help a college girl out, people!
Me, on the far left, with my Let's Cha Cha bottoms I got for a STEAL!

Guiding Light Grace Shorts Sz 2 - FOR SALE!

Hotty Pink Sailor's Valentine Jessy Dress Sz XS (and it has POCKETS!!!) - FOR SALE!

Let's Cha Cha Sarasota Beaded Tunic - my new purchase!

If you, or any other Lilly lover you know, are interested in one of these pieces, email me or comment on here and I will give you any information that you need! Thanks!


Friday, June 13, 2014

Cooler Jug Crazy


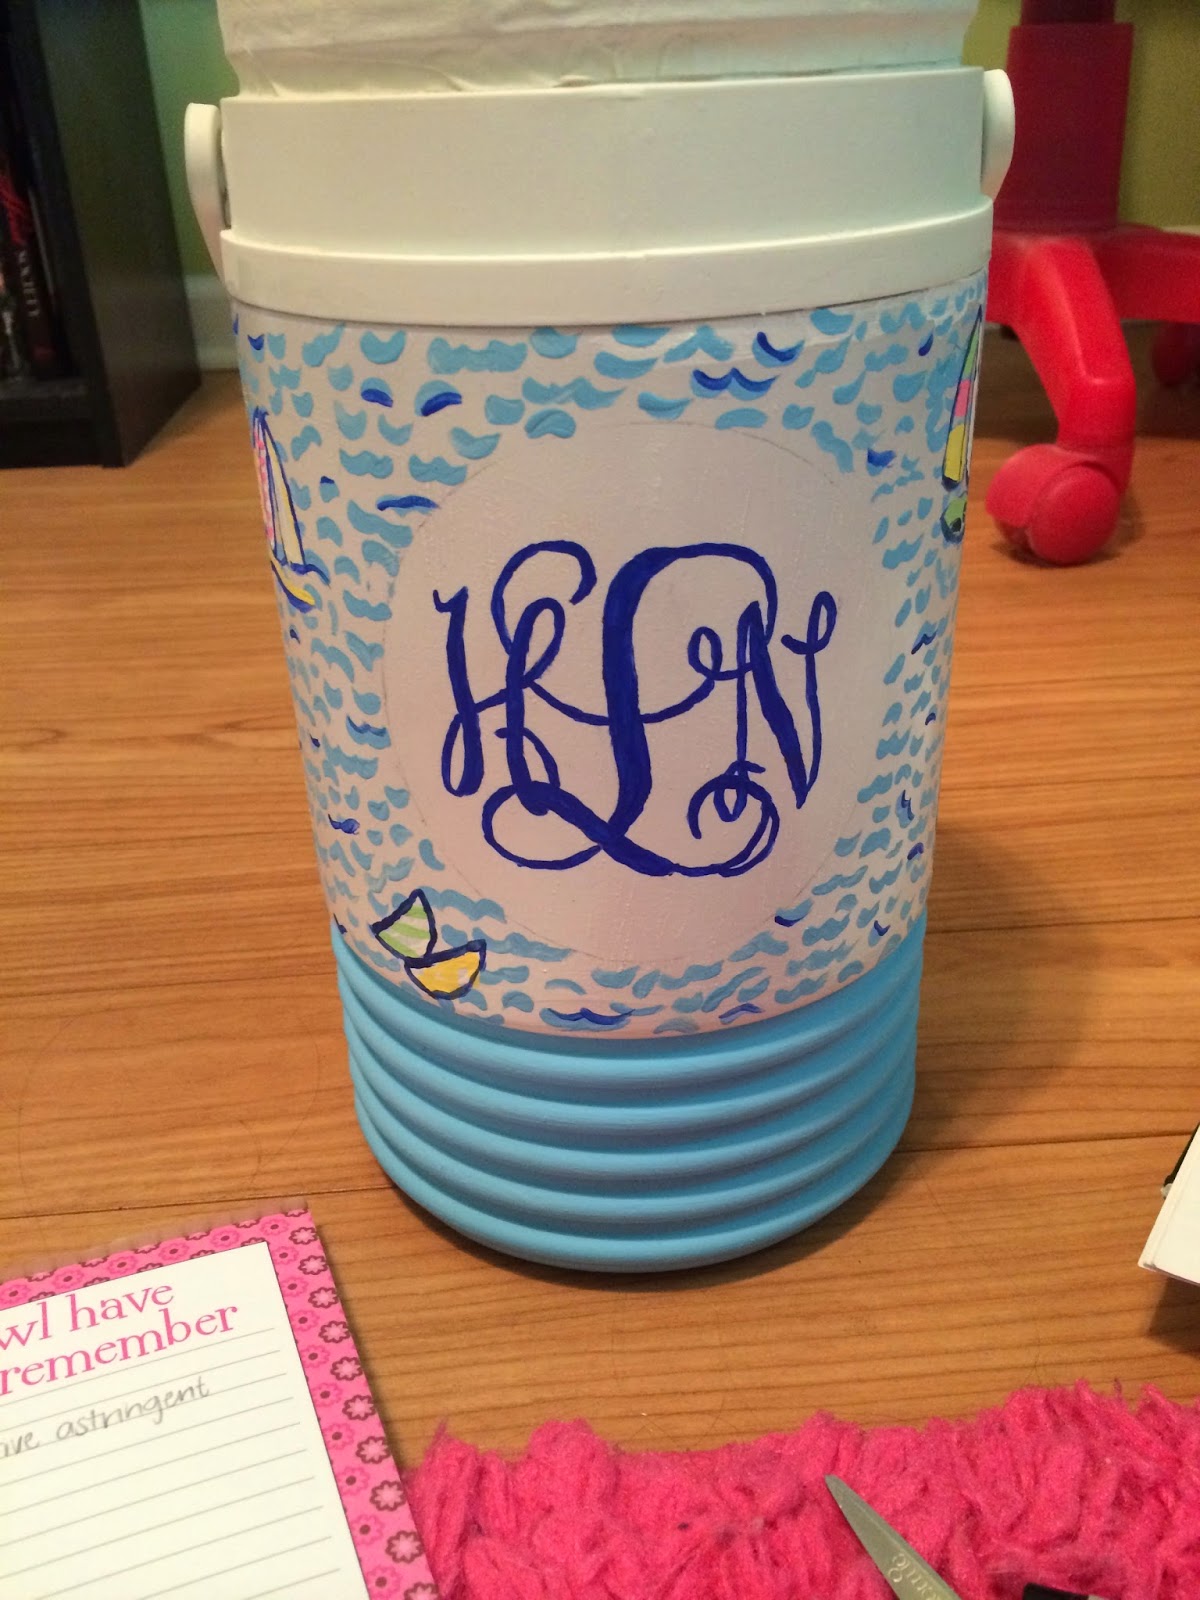
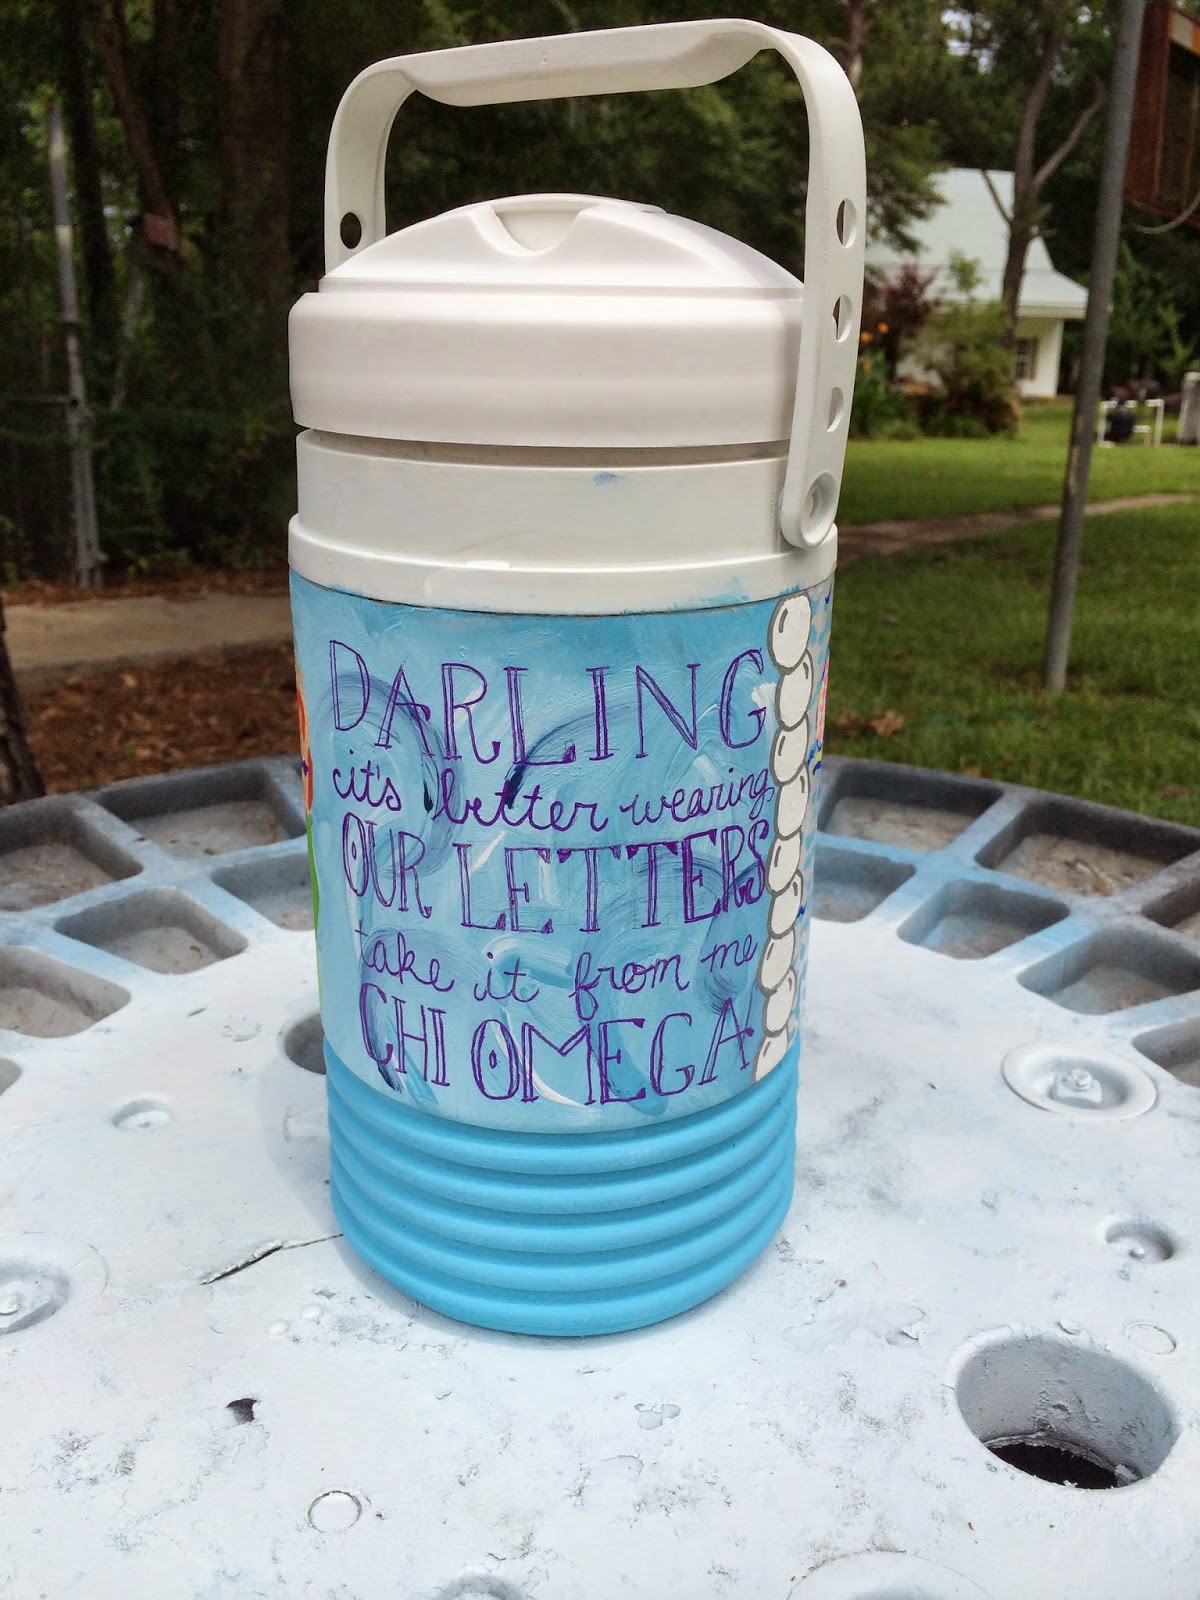
I FINALLY finished my cooler jug. I have been through quite a lot with this particular cooler, and I'm so glad to be finished with it. The first time I painted it, back before Christmas break, I had to completely redo it. I had seen everyone on Pinterest painting coolers, and I thought this would be a great way to start. Plus, it was only $5 at Dollar General! I should have read more into it, because I did not know to sand it. I primed it, taped it off and began to paint. I got one side completely done, and that's when tragedy struck. The painter's tape completely peeled off my primer and all of the paint. Being me, I got upset and didn't touch it for a few more months. I was bored one day while off at school, so I decided to get the cooler jug back out and sand all of the paint off and get it ready to paint again. I ended up not touching it again for a while due to painting a formal cooler and finals, but I finally got it out a week ago to finish it. I painted Lilly Pulitzer's You Gotta Regatta on one side with my monogram, and I got the inspiration for the other side from a shirt I found on the Chi Omega Shirt Swap. I freehanded everything on the cooler jug except for my monogram (and the mermaid, but my brother drew that so it still counts right?) So you don't end up like me the first time I tried to do this, here are a few tips.

1. SAND THE COOLER!!!
2. Prime. I use Krylon for plastic primer in white. (It says no sanding required, but you have to sand to get the smooth finish off so the paint has something to adhere to.)
3. Pick out your designs. I love Lilly, and You Gotta Regatta seemed fairly simple to paint. But be warned, it was a lot more time consuming than I thought. The trick is to pick something that will work with your skill level so you don't get frustrated. I am a decent painter, but I don't do anything super intricate because I get frustrated with myself if I don't get it exactly how I imagined it. (I'm also a bit of a perfectionist…)
5. Paint! Below I'll show you the progress of painting my cooler. I forgot to take pictures of some parts, so just bear with me!
6. Seal it so the paint doesn't chip off!
To do this side, I just used the white primer as my background color. I went to The Printable Monogram and printed out the monogram that I wanted, and used the circle to draw a circle on the cooler where I wanted my monogram to be. (This is the actual monogram I used.) Next, I painted the waves, and then the sailboats.
To do the monogram,  I traced it onto tissue paper (the cheaper quality, the better!)
I licked the corners of the tissue paper to get it to stay in place without having to use tape. Then I used an ultra fine tip Sharpie to LIGHTLY trace the monogram. If you do the Sharpie to dark or thick, it can be hard to cover with paint, especially if you are using a lighter color of paint.
This is what it should look like. ^^^
It's going to take a few coats of paint, so don't get frustrated if it doesn't look like you want it to right away.
This is after three coats of paint, and what I was happy with.
To do the silver dots around the circle, I took a clean pencil eraser and dipped it in paint. Super easy and all of your dots will be the same size.
For this side, I didn't want a solid, plain background. Instead I took the colors that I used on the other side and made "waves". My brother then drew the mermaid for me (he got all of the artistic talent). Then, I did all of the painting and lettering.
I freehanded all of these letters. I used Simon Script from DaFont as a go-by for the big letters, and the small letters are just my regular cursive.
I used a paint pen to go over the letters. I deviated from my normal brand of paint pens because this brand had the color and size I wanted in stock. The paint pen was absolutely awful, but nevertheless I finally got it all outlined.
For the pearls on the side, I traced the lid of a bottle of nail polish onto a piece of copy paper and cut it out and used it as a template. After I traced out all of the pearls like I wanted, I painted it white. After 375823794 coats it seemed (more like 5), I used a silver Sharpie to outline the pearls.
If your cooler jug has ridges around the bottom like mine, it's easier just to paint it a solid color that coordinates with both sides instead of trying to paint on them.
Once you're finished, just Mod Podge and clear coat. On The Cooler Connection people suggest using MinWax polycrylic to seal, but I haven't tried that yet. I just use a Krylon clear coat spray over the Mod Podge.
Here is the finished project!!


I would love to see your projects! Just send them to me on Pinterest or leave a comment with a link to the pictures!

Tuesday, February 11, 2014

Cooler Madness

Making a cooler is so fun and rewarding. Visit my cooler painting tutorials here and here for great tips and tricks on painting any kind of cooler!

My first attempt at cooler painting. I'm absolutely in LOVE with how it turned out!


Sweet Caroline…bum bum bum!


Get nauti, Merica ;)


I long for salt air in my hair…


Sweet home Troy, Alabama. Go Trojans!


Inspired by Lilly and, of course, monogrammed!