-moz-box-shadow: 1px 1px 5px rgba(0, 0, 0, .1);
Showing posts with label blue. Show all posts

Wednesday, August 13, 2014

Sophomore Dorm Room


I'm finally moved into my dorm room and settled down! I'm absolutely in love with how my room turned out and how homey it feels!

Here are some before pictures:


And AFTER!:
My awesome headboard is from Artist Tree

I actually painted the wall piece by myself! I'm super proud of it!!

You can find my wall monogram at Southern Proper Monograms


How cute is my monogrammed owl door hanger?! Another awesome Artist Tree product!!


How do you make your dorm room feel more homey? Share your ideas in the comments!

Tuesday, July 15, 2014

How To Survive Your Dorm Room - Bed

The How To Survive Your Dorm Room saga continues! I've already shared how to survive your bathroom and closet, and now it's time for the fun part…your actual room! There's so much I can talk about, so I'm going to split this part of the series into two posts! Part 1: How To Survive Your Dorm Room - Bed. Stay posted for Part 2 (How To Survive Your Dorm Room - Everything Else)!


Your bed is one of the most important pieces in your dorm room, decoration and storage wise. Most people decorate their rooms around the bed, because it is the most noticeable piece in a dorm room. Here's how to make the most of your dorm room bed, starting from the basics:

1. Mattress pad
This is probably the most important (and overlooked) piece of bedding that you need. It doesn't matter how cute your bed looks if it's not comfortable to sleep on. Your mattress pad is the one thing that I recommend splurging on! You want to get the most comfortable thing you can! Dorm mattresses are not comfortable, in case you were wondering. I decided to go the cheap route and buy just a plain old mattress topper that I thought would be ok (note: it was not a Tempurpedic or any fancy brand). I was W-R-O-N-G! I barely slept for an entire week until my parents could bring me another one. My new mattress pad was a Laura Ashley Fiberbed, and it was like sleeping on top of a giant down pillow! My roommate, who had the same one, equated it to "being surrounded by little, tiny angels hugging you and telling you not to get out of bed." So, the moral of the story is don't be cheap like I was, and go ahead and buy a good mattress pad. Don't forget your mattress protector while you're at it!

2. Sheets
I bought every single cute set of sheets that was not outrageously expensive. Problem numero uno was that I didn't need ten sets of sheets. Problem numero dos was that I bought mainly twin size sheets, which was a big issue because I didn't realize that my mattress was a twin XL. Luckily, a friend bought my regular twin sheets because they would fit her bed. That being said, before you buy bedding check what size bed you will have! A good rule of thumb is to have at least two sets of sheets: one on your bed, and one for a spare/to change out when you wash your other ones. I had three sets of sheets, just because I liked to change it up a bit. Changing out your sheets is the easiest and usually cheapest way to change up your bedding if you're looking for something new!

3. Bedding
A comforter or duvet is going to be the best way to express yourself in your dorm room. This is usually the first thing people will notice when they come in your room, and it ultimately needs to be something that you absolutely love. You're going to be seeing a lot of your bedspread, so make sure it is something that you're not going to get tired of. My favorite color is blue, but when shopping for bed spreads I stayed away from bright, loud colors and patterns because I knew I wanted something calm and simple. Another great idea is to get a reversible bedspread! Mine is blue/white chevron on one side, and another chevron pattern with different colors on the other side. So, whenever I get tired of one side, I can easily change it to the other side for something different. 

4. Pillows 
Your pillow should follow the same rule as your mattress pad. Make sure you get something comfortable that you will be able to get a good night's sleep with! You'll also need another pillow for your sham, and decorative pillows if you want! I hate sleeping with a lot of pillows and stuff on my bed, so I kept my pillows to a minimum. I had one pillow in a sham, the pillow that I slept on, a giant floor pillow (that I used as a backrest when I wasn't sleeping), and two decorative pillows. Just keep in mind that you have to keep the pillows somewhere if you don't keep them on your bed. 

5. Storage
Your bed is one of the most underestimated places to store all of your stuff. I was able to store most of my stuff that would not fit in my closet under my bed. At my school we have adjustable bed frames, so I raised it to the highest setting, which was the perfect height to put white plastic pullout drawers underneath my bed. I had two wide ones, and one narrow one. Because my bed was all the way against a wall, I kept these right at the front for easier access. I put things that I didn't necessarily need often (like the box to my printer and duffel bags) behind these bins. In one bin I kept towels, washcloths, and sheets. In another I kept food, tumbler cups, tupperware bowls, utensils, etc. You can use drawers like this store anything and everything!

6. Bedskirt
If you want to hide what all you store under your bed, a bedskirt is the best solution! Instead of specially ordering a bedskirt or making my own, I used the one that came with my bedding set. Since you could only see one side of my bed, I folded the bedskirt in half and staggered it to create a "ruffle". To keep the bedskirt from falling down, I safety pinned it to the bed frame. By creatively using my bedskirt this way, I saved myself time and money by not having to make my own!

7. Headboard
A headboard isn't essential, but definitely makes your dorm room feel a little more homey. My roommate and I didn't use actual headboards, but hung up wall decor to give the visual effect of a headboard. You can also make your own by following one of the DIYs on Pinterest! This year I'm getting an actual headboard made from Artist Tree! Be sure to check back in August for pictures!

8. Bedside table
This is something that I didn't even think about until I moved in! Luckily, my roommate moved in before me and had bought a set of small tables, so she let me use one as my night stand. This isn't something I would qualify as a necessity, but it is great to keep an alarm clock and bottle of water on. If you don't want to buy a bedside table, or even if you're on the top bunk, check out this Bedside Storage Caddy!

All of the pictures posted are from my dorm my freshman year. I'll be living in the dorms again my sophomore year, and I can't wait to post pictures of my new room! Check back in August to see it…you're not going to want to miss it! ;) Like my dorm room? Have any other storage ideas? Headed to college soon? Leave me a comment and tell me!

Love my monogram and my owl? Find the monogram here and the owl here or here!


Wednesday, June 25, 2014

Red, White, and Better Than You


I made this 1/2 gallon cooler for a sweet friend of mine. I've had a couple of people ask me how to paint a cooler jug, so I've decided to make this post very detailed. I tried to take pictures of every step (but I did forget to take a few pics of some steps, so bare with me!).

The first thing to do is go buy a cooler jug (duhhhhh!). This was one that I have had for a while and I've been meaning to paint. Look for a cooler jug with a relatively smooth surface, and as little grooves and indentions as possible. (This one didn't meet the qualifications very well, but I already had it. So, oh well.)
When I get the cooler home, the first thing I do is wash it so as soon as I get it painted it's ready to use.
After it's washed, tape off the top with painter's tape or masking tape. This keeps all the dust from sanding, spray paint, and just gunk out of it.
Sand the cooler. I usually start out with a coarser grit (about 60) to get off the finish, then sand with a finer grit (about 220) to smooth is out. I forgot to take a picture of it before I primed it to show what it should look like. YOU HAVE TO SAND THE COOLER!!! Even if your primer says "No Sanding Required", the paint will peel right off! (Believe me, I know firsthand.) Plus, it literally takes no more that 15 minutes!
PRIME! PRIME! PRIME! This is important because this is the foundation for all of your hard work. Make sure you use a spray paint made for PLASTIC! I normally use the Krylon Fusion for plastic, but I ran out and picked up some of the Valspar Premium that bonds to plastic. Both worked well for me.
The two sprays I used as primer.
What your cooler should look like primed.

Now the fun begins! You can start painting the details. Start by deciding what you want to paint. I knew I wanted to make this cooler America themed because my friend LOVES America! 
I decided to do a Chevron background, which proved harder than it seemed. I tried to tape on a chevron design, look for chevron painters tape (which I found on Pinterest, but was sold out every where locally.), tried Pinterest tips, and everything! My problem lied in the fact that the cooler was completely circular. I ended up buying chevron scrapbook paper and cutting out a template and taping it on, then stenciling it out.
After I cut out a template from the scrapbook paper, I taped it on using painter's tape. Make sure everything is lined up correctly and evenly! Then,  I used a pencil to trace the design.
I put a painter's tape in the stripes that were going to stay white so I wouldn't accidentally paint something the wrong color. (Thanks for the idea Pinterest!)
After I painted the red chevron, I added a gold stripe on the tops and bottoms of the stripes with a metallic gold paint pen to make the lines look more crisp and clean.
I did a layer of ModPodge over the chevron so it would not get messed up. TIP: If you do a layer of ModPodge before you do anything detailed, it is easier to fix mistakes. The ModPodge acts as a sealer over the previous layer of paint, making it a lot easier to clean up mistakes without messing up all of your hard work!

My friend is from Texas, and we go to school in Alabama, so putting the states on the cooler was a no brainer! I put hearts over her hometown and our school, and also put a cross over where she is a camp counselor. 
Deep in the heart of Texas...

Go Trojans!!

To put the outline of the states on the cooler, I traced the image onto a tissue paper. Next, I placed the tissue paper on the cooler where I wanted it, then I used a fine tip black Sharpie to trace the outline. The Sharpie will bleed through the paper and leave an outline that you can paint over. 


I also put a saying from Future First Lady that says "Red, White, and Better Than You".

I used the same process for outlining the states. I freehanded this, but check out daFont.com for cool free fonts!

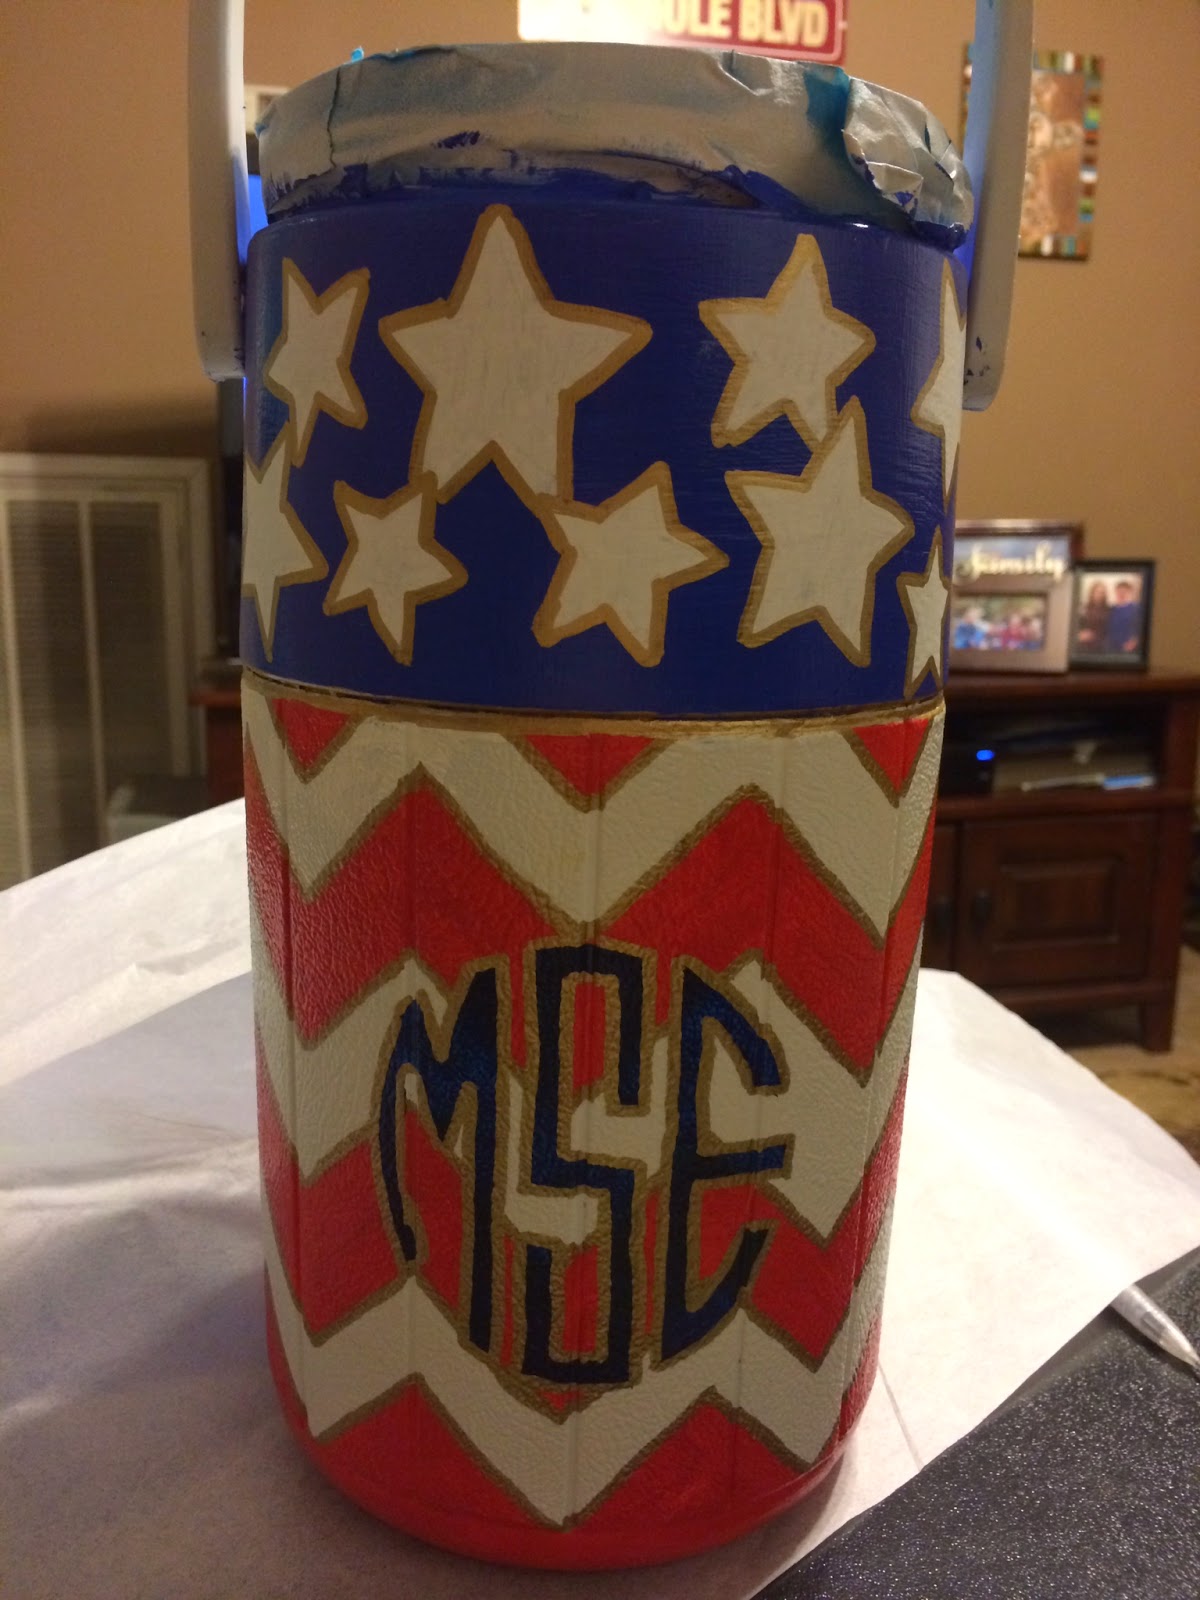
For the front, I decided to put her monogram, because, DUH!
Same process because it's super easy!
Final result!


The overall goal was for the cooler to mimic a flag, so I painted to top portion blue with white stars.


Add any decorations. This can be rhinestones, glitter, etc. I puts bows that I got for $1 a piece at Wal-Mart on both sides of the handle. 

SEAL! First, I do 2 or 3 layers of Mod Podge, then I use a spray sealant. Make sure the Mod Podge is COMPLETELY dry before you use the final sealant or you will end up with a mess!! I tried this Rustoleum sealant that someone suggested, but I wasn't a huge fan of it. I guess I am going to have to break down and buy the MinWax Polycrylic to dry.
ModPodge goes on white, but dries clear! I use at least two coats before I do the final seal.
The final sealant I used. I sprayed two coats.


The final step is to WOW everyone with your awesome crafting skills! And post it to The Cooler Connection on Facebook!

The final result! Can't wait for my friend to get it! P.S. It only costs $6.85 to ship this cooler jug from AL to TX!